
Wiring diagram for 7 way trailer plug sets the stage for this enthralling narrative, offering readers a glimpse into a story that is rich in detail and brimming with originality from the outset.
Understanding the intricate network of wires within a 7-way trailer plug is crucial for ensuring safe and reliable towing. This comprehensive guide delves into the purpose and function of each pin, explores different wiring configurations, and provides step-by-step instructions for installation and troubleshooting.
Whether you’re a seasoned trailer owner or a novice about to embark on your first towing adventure, this guide will equip you with the knowledge and confidence to navigate the world of 7-way trailer plug wiring.
Understanding the 7-Way Trailer Plug


The 7-way trailer plug is a standard electrical connector used to connect a trailer to a towing vehicle. It provides the necessary power and lighting functions for the trailer, ensuring safe and efficient towing.
Purpose and Function of Each Pin
The 7-way trailer plug consists of seven pins, each with a specific function:
- Pin 1 (Ground):Provides a ground path for all electrical circuits, ensuring proper operation and safety.
- Pin 2 (Left Turn Signal):Powers the left turn signal lights on the trailer.
- Pin 3 (Right Turn Signal):Powers the right turn signal lights on the trailer.
- Pin 4 (Tail Lights):Powers the tail lights on the trailer.
- Pin 5 (Running Lights):Powers the running lights on the trailer, which are always on when the vehicle’s headlights are on.
- Pin 6 (Electric Brakes):Powers the electric brakes on the trailer, if equipped.
- Pin 7 (Battery):Provides a 12-volt power source from the towing vehicle’s battery to the trailer.
Types of 7-Way Trailer Plugs
There are two main types of 7-way trailer plugs:
- Flat:This type is the most common and features a rectangular plug with seven flat pins arranged in a row.
- Round:This type features a round plug with seven pins arranged in a circle. It is less common than the flat type but is still used by some manufacturers.
Wiring Configurations of Different Trailer Manufacturers
Different trailer manufacturers may use slightly different wiring configurations for their 7-way plugs. However, the basic functions of each pin remain the same.
Understanding a wiring diagram for a 7-way trailer plug can feel like deciphering a foreign language, but it’s crucial for ensuring your trailer’s lights and brakes function properly. Just like keeping track of the Dante controller version history for audio systems, knowing the correct wiring configuration for your trailer plug is essential for a smooth and safe towing experience.
With a little patience and a good diagram, you’ll be well on your way to confidently connecting your trailer and hitting the road.
Note:It’s essential to consult the owner’s manual for your specific trailer to ensure you understand the correct wiring configuration.
Common Wiring Diagrams for 7-Way Trailer Plugs: Wiring Diagram For 7 Way Trailer Plug

A standard 7-way trailer plug is commonly used for connecting trailers to vehicles. Understanding the wiring diagram is crucial for safe and proper trailer operation.
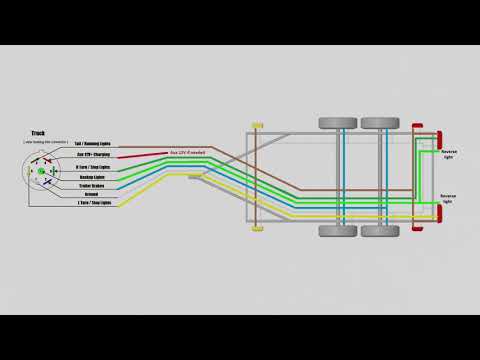
Standard 7-Way Trailer Plug Wiring Diagram
The standard 7-way trailer plug wiring diagram depicts the arrangement of wires and their corresponding functions. It is essential to refer to the manufacturer’s instructions and vehicle’s wiring manual for accurate and safe installation.
| Pin Number | Wire Color | Function |
|---|---|---|
| 1 | Brown | Right Turn Signal |
| 2 | Yellow | Left Turn Signal |
| 3 | Green | Ground |
| 4 | White | Tail Lights |
| 5 | Blue | Electric Brakes |
| 6 | Red | Stop Lights |
| 7 | Black | Battery/Running Lights |
Troubleshooting Wiring Issues
Troubleshooting wiring problems in a 7-way trailer plug can be frustrating, but a systematic approach can help you pinpoint the issue and get your trailer up and running. This section will guide you through common troubleshooting steps, potential causes for wiring faults, and methods for testing the continuity of each wire in your trailer wiring system.
Common Troubleshooting Steps
The first step in troubleshooting wiring issues is to identify the symptoms. For example, are your taillights working but not your brake lights? Or is your trailer’s electric brakes not engaging? Once you know the symptoms, you can start narrowing down the potential causes.Here are some common troubleshooting steps to follow:
- Check the fuses:Blown fuses are a common cause of wiring problems. Start by checking the fuses in the tow vehicle and the trailer. The fuse box in your tow vehicle will have a diagram that shows the location of the fuses for the trailer lights.
The trailer’s fuse box, if it has one, should also have a diagram.
- Inspect the connections:Loose or corroded connections can also cause wiring problems. Check all the connections in the tow vehicle, the trailer, and the 7-way trailer plug. Make sure the connections are clean and tight.
- Test the ground connection:A poor ground connection can cause a variety of electrical problems. Check the ground wire at the trailer and the tow vehicle.
- Check the wiring for damage:Look for any signs of damage to the wiring, such as cuts, abrasions, or melted insulation. If you find any damage, you’ll need to repair or replace the damaged wiring.
Potential Causes for Wiring Faults, Wiring diagram for 7 way trailer plug
Several factors can contribute to wiring faults in a 7-way trailer plug system. Here are some common causes:
- Blown fuses:Overloaded circuits or a short circuit can cause fuses to blow.
- Loose connections:Vibrations or moisture can loosen connections over time, leading to intermittent or complete failure of electrical circuits.
- Corroded connections:Corrosion can build up on electrical contacts, increasing resistance and preventing proper electrical flow.
- Damaged wiring:Worn insulation, cuts, or abrasions in the wiring can expose wires and create shorts or open circuits.
- Faulty electrical components:Defective bulbs, switches, or other electrical components can also cause wiring problems.
Testing Continuity of Wires
Testing the continuity of each wire in the trailer wiring system can help identify broken wires or faulty connections. You can use a multimeter to test continuity. Here’s how to test continuity using a multimeter:
- Set the multimeter to the continuity test mode.This is usually represented by a symbol that looks like a diode.
- Connect one probe of the multimeter to one end of the wire.
- Connect the other probe of the multimeter to the other end of the wire.
- If the multimeter beeps or shows a low resistance reading, the wire is continuous.This means the wire is unbroken and conducting electricity properly.
- If the multimeter does not beep or shows a high resistance reading, the wire is not continuous.This means the wire is broken or has a poor connection.
You can use this same method to test the continuity of each wire in the 7-way trailer plug, the trailer wiring, and the tow vehicle wiring.
Installation and Modification
Installing a 7-way trailer plug on your vehicle is a straightforward process that can be done with basic tools and a bit of patience. It involves connecting the trailer wiring to your vehicle’s electrical system, ensuring proper functionality for all trailer lights and accessories.
Installing a 7-Way Trailer Plug
Installing a 7-way trailer plug involves connecting the trailer wiring to your vehicle’s electrical system. Here’s a step-by-step guide for installing a 7-way trailer plug:
- Choose a suitable location:Select a location on your vehicle’s rear bumper or frame that is easily accessible and away from moving parts. Consider the length of the trailer wiring and ensure the plug is easily reachable for connecting your trailer.
- Prepare the wiring:Determine the correct wire colors for your vehicle’s trailer wiring harness. Use a wiring diagram to match the wire colors to their respective functions. Strip the insulation off the ends of the wires to expose the bare wire.
- Connect the wires to the 7-way plug:Connect the stripped wires to the corresponding terminals on the 7-way plug. Use crimp connectors or wire nuts to create secure connections. Make sure the connections are tight and secure to prevent loose connections.
- Install the 7-way plug:Mount the 7-way plug to the chosen location using screws or a mounting bracket. Ensure the plug is securely fastened and aligned with the trailer connector.
- Test the connections:After installing the plug, test all the trailer lights and functions to ensure they are working properly. Connect a trailer to the 7-way plug and check the taillights, brake lights, turn signals, running lights, and other accessories.
Splicing Wires and Creating Secure Connections
Splicing wires is a crucial part of connecting the trailer wiring to your vehicle’s electrical system. This involves joining two or more wires together to create a continuous circuit. Here are some common methods for splicing wires and creating secure connections:
- Crimp connectors:Crimp connectors are small metal pieces that are used to secure wire ends together. They are available in various sizes and shapes to accommodate different wire gauges. Crimp connectors are easy to use and provide a reliable connection.
Understanding the wiring diagram for a 7-way trailer plug is essential for ensuring a safe and functional connection between your vehicle and trailer. Each wire plays a crucial role, from powering the trailer lights to providing a brake signal.
Think of it like the intricate connection of stars in the milky way hair , where each strand works together to create a stunning visual display. Similarly, the 7-way trailer plug ensures all the trailer’s functions work harmoniously, making your journey smooth and enjoyable.
- Wire nuts:Wire nuts are plastic caps that are used to twist wire ends together. They are simple to use and provide a secure connection, but they may not be suitable for high-current applications.
- Solder and heat shrink tubing:Soldering is a process that uses heat to melt solder and join wire ends together. This method provides a strong and durable connection, but it requires more skill and equipment. Heat shrink tubing is used to insulate and protect the soldered connection.
A 7-way trailer plug wiring diagram can seem complicated, but with a little patience and the right tools, you can master it. The history of the Chateau Wells, a Chicago landmark with a rich past, chateau wells history chicago , is a reminder that even the most complex systems can be understood with a little research.
Just like a well-wired trailer, a building’s history is a testament to the craftsmanship and ingenuity of those who came before us.
Modifying a 7-Way Trailer Plug
Modifying a 7-way trailer plug is necessary when a trailer requires different wiring configurations. This involves changing the connections between the wires and the plug terminals. For example, you might need to modify a 7-way plug to accommodate a trailer with a backup camera or a trailer with a different lighting system.
Wiring a 7-way trailer plug might seem complex, but it’s a vital connection for hauling your gear. It’s a connection that reminds me of the old days, when families would pack up their cars and head to the lake for a weekend getaway.
Learning about the history of four way lake hills made me realize how important those simple pleasures were, and how a well-wired trailer could help make those memories last. With a proper 7-way setup, you can be sure your trailer lights are working and your appliances are powered up, ready for your next adventure.
Modifying a 7-way trailer plug requires careful planning and attention to detail. Ensure you understand the wiring diagram of your trailer and the 7-way plug before making any changes.
Ending Remarks

Mastering the intricacies of a 7-way trailer plug wiring diagram empowers you to confidently tow your trailer, knowing that every connection is secure and functioning as intended. This guide has provided a foundation for understanding the purpose of each pin, common wiring configurations, and essential troubleshooting techniques.
Remember, a well-maintained wiring system is the cornerstone of a safe and enjoyable towing experience.
FAQ Corner
What are the different types of 7-way trailer plugs?
There are two main types: flat and round. Flat plugs are more common in North America, while round plugs are often found in Europe and other regions.
How do I test the continuity of the wires in my trailer wiring system?
Use a multimeter to check for continuity between each pin on the 7-way plug and the corresponding wire at the trailer’s taillights, turn signals, and brake lights.
Can I modify a 7-way trailer plug for specific trailer requirements?
Yes, you can add or remove pins to accommodate features like electric brakes or auxiliary power outlets.


